
In a desperate bid to give you some content before I fly to India and Nepal and leave you orphans for a month, I have been posting a little more than usual. For some of you this means four weeks of reading the back-log. Which is good – that’s how long I will be gone.
As I reflected on the transition to digital I remembered that one of my biggest adjustments was switching my understanding of what is and is not a proper exposure. I grew up on Ansel Adams’ Zone System and I think that gave me a really solid base for understanding how meters work and how to use that to maximum advantage. I’m no techy, in fact I’m pretty pragmatic, but the Zone System worked, even if I still struggle to understand the intricacies that fill books. But exposing for digital is not exposing for film. Different monsters altogether.
So here’s a few pointers.
1. The bulk of the digital information is contained in what is displayed as the right side of the histogram. Try to expose your images so the histogram is as close to the right side without blowing out the highlights. Unless you have specularity – like the sun, a lightbulb, anything that SHOULD be blown out. Keeping your exposure biased in this direction gives you the most digital data and generally allows you to tweak your image with the least amount of damage to the pixels. For your viewing pleasure, exhibit A:
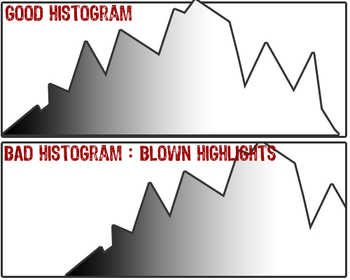
2. Having said you shouldn’t blow out the highlights do not default to underexposing. Don’t go off the right side of the histogram, but get close to it. If you get paranoid of blowing the highlights and deliberately underexpose you will plug the shadows and attempts to bring them back will bring alot of noise into your image.

3. Shoot RAW. Always. Unless you have a really good reason not to. RAW allows you unparalleled ability to adjust for exposure errors and gives you greater latitude than film shooters ever imagined. JPG does not. If you blow a highlight in JPG, it’s not something you can recover and still maintain the highest image quality. By all means shoot RAW+JPG if you want, but shoot RAW. Really.
4. There are times when the lighting goes from deep blacks to bright lights in a range that is greater than what you can expose for while still keeping the shadows from plunging and the highlights from being blown. In techy terms this means you have a higher dynamic range of light than your sensor is able to capture. And sadly there are only a few things you can do. You can use fill flash or reflected light to bring up the shadows a few stops. You can allow the black to simply be really black – you’re an artist dammit! – and then use Lightroom or Photoshop to bring them back some. Or you can put that camera on a tripod, bracket your exposures enough stops apart to cover the dynamic range, and then use the Merge to HDR function in Photoshop to create an image that works for you.
So it really comes down to the histogram. Use the LCD/Preview screen to check composition, and the histogram to check exposure. Expose for the highlights and keep the histogram to the right as close as you can without going off the side and blowing the whites. See, i told you it was an oversimplification. There are long, looong articles out there on just this subject, and this clearly can’t cover it all. But it can get you started and get you exposing images that keep all the data you need to create the highest quality images.
I have it on good authority that Scott Kelby reads this blog daily. (So I’m under great pressure to produce!) – if I’ve erred in any of this or there is anything further to add, I suspect he’s the one to do it, so keep your eyes on the comments for additions, corrections, and the odd Scott Kelby sighting.