In my last posts I talked about my reactions to working with both my Fuji XE-1 and Leica M, and I mentioned zone focusing. For those for whom the idea of zone focusing is new I wanted to explain it a little. It’s an old technique but it’s simple and reliable.
My biggest concern with Leica, and the Fuji when using a manual focus lens (which it does beautifully with Leica M-mount, or Zeiss, lenses and an adaptor), is the speed at which I want to focus. Sometimes the Fuji isn’t as responsive as I’d like even when using autofocus. But zone focusing – as long as you’re not after really shallow depth of field (DOF), and you don’t mind using the lenses past their absolute sharpest point, can be faster than any SLR. You just compose and press the shutter. No focus hunting, no cussing at the camera. It’s why we’ve repeated the mantra, “f/8 and be there” for so many years. At f/8 on most lenses, with reasonable distance between camera and subject, the zone of focus is so broad you’d have to be trying to miss it.
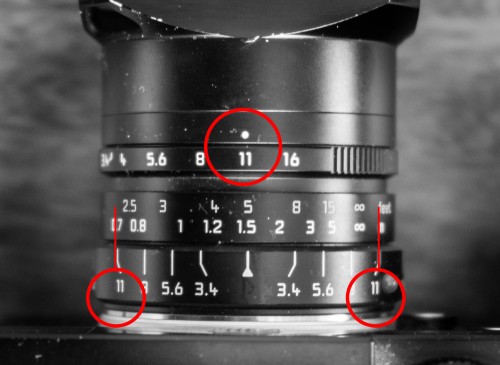
As I write this I’m sitting outside in Zanzibar. It’s bright. My ISO is 200, my shutter speed is 1/60, my aperture is f/11, and my mango juice is perfect. That last part isn’t important but it’s nice. Any rangefinder lens, including some of the Fuji lenses (like the 14 and the 23/1.4 which is the classic street photographer’s focal length), have a focus distance scale on them. Right now if I focus my 21mm lens on my subject 5 feet away and look at that scale, it shows me that everything from 2.5 feet to infinity is in focus (see the illustration below). Keep my focus ring there (put a piece of gaffer tape on the bottom of the body and you’ll have a way of making sure it doesn’t move – those Fuji lenses have a tendency to drift) and I have a huge zone of focus. So large in fact that I don’t really have to focus any further. I compose and press the shutter.

The f/stop (f/11) is circled at top. Look to the scale at the base of the lens for the corresponding f/stop. Follow the indicators to your distance scale. That is your zone of focus for that lens, at that f/stop and distance.
That, in a nutshell is zone focusing. It’s simple and photographers have used it for ages, but with modern lenses we’ve often lost these scales and have come to rely on the “what you see is what you get” of the SLR.
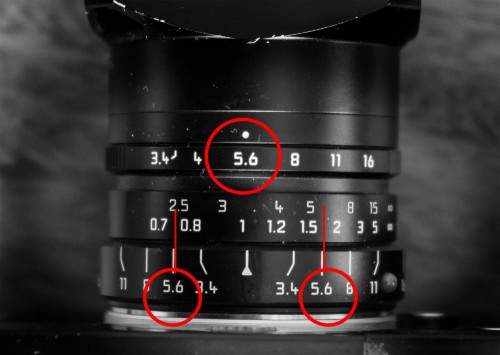
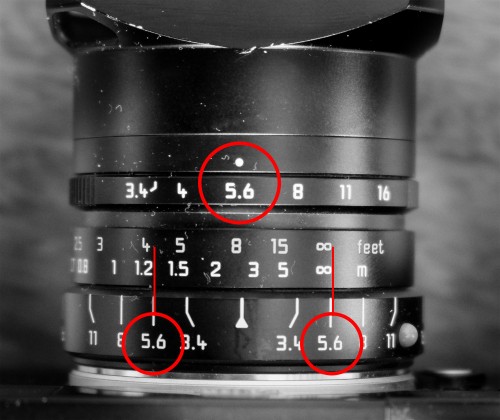
With this same lens at f/5.6 I could have a focus zone from 2.5 feet to just over 5 feet, or 4.5 feet to infinity (see the two illustrations below). So the closer your subject at any given aperture, the shallow that zone.
I use zone focusing in two ways – the simplest is the way I’ve just described it. Set a zone that’s as deep as I can get it, and one that includes whatever I’m likely to be photographing, say anything from 3 feet to near-infinity, and then I go. Or I’ll focus by estimating my distance to subject, knowing I have a margin of error of xx distance on either side of that subject.
Focus rings can move, so you have to watch that it is where you want it, and you have to be willing to keep your aperture where you want it – which’ll mean using shutter speed and ISO to regulate exposure but if you use your camera in manual most of the time you’ll get used to this pretty quickly. And that’s the real benefit of all this: speed. Clearly there are situations you won’t want to be, or aren’t able to be, at a tighter aperture, but when you can, zone focusing allows you to photograph very, very quickly. On the streets, or when there’s lots going on, zone focusing is hard to beat.


Comments
Great information David. Trying to focus while walking the streets with my Olympus-OM1 and 28mm lens has been driving me crazy. And estimating distances while on the move has had mixed results. Using this system allows me to concentrate on the near focal length, which will be much easier. Looks like it’s time to load up some more film.
Thanks
Pingback: Links: January & February 2014
Thanks for the reminder, and short refresher course in Zone Focusing. I had dabbled a bit with this, using Nikkor AI-S manual-focus lenses, wth an adapter, on Canon bodies, a few years ago. The newly-lowered price of the Fuji X Pro has prompted me to consider adding a Fuji body, and trying adapted Nikkor lenses on it.
I wish you a full recovery from your surgery, and will say a prayer for you!
Another interesting and informative post, thanks David. It reminds me of a time before digital photography and autofocus cameras. As you allude to in your response to Michal’s comment above there is an iPhone app to calculate DOF and hyperfocal distance. It also indicates resolving power so that you can maintain levels of resolution suitable for the final output (on-screen viewing, large print etc.). The app is OptimumCS-Pro. It works well and it only takes a few seconds to find the most suitable camera settings at the beginning of a shoot. I agree that the Fuji X-E1 could do with a little more resistance to movement in both the Fujinon lenses and the camera dials.
Hope your surgery goes well and you make a speedy recovery.
This is all true and is good advice but do bear in mind that the markings on the lenses are based on film’s resolution, not a 24MP sensor. The DoF calculations are far less forgiving if you utilise the full res of the files to the point where your zones will be about 1/4 as wide as the markings suggest. Zone focussing has been used by Leica photographers since forever, but needs to be rethought slightly if you want the best quality results.
David, thanks for sharing this information! I’m already using zone focusing on my Fuji X100. I sometimes use it on the X-Pro1 as well, but not so often.
Thank you for sharing this information about zone focusing. My older Minolta lenses still show these scales and work perfectly on my Sony Alpha 🙂
I’ve been using my Fuji X100 on P with dynamic ISO and zone focusing since I got it, however I shoot on the London Tube at very low light so my auto aperture tends to go down to f2.0 so you have to be incredibly accurate with your distance. It’s incredibly challenging but for some reason even more satisfying when you get it right!
http://www.flickr.com/photos/spooke/11625422996/
This is such basic and useful information that every photographer should know. They did not teach this in my art school, but I teach it every chance I get. Your explanations are concise and clear. Thanks for posting.
Oh wow! This is a keeper! So simple and yet has slipped right by me for decades. Thanks!
Ah! Mango juice! 😉
Solid information in the post.
Thanks for jogging my memory to an old trick I used to use in my stereo (3D) photography days with an old Revere rangefinder. This will come in handy as I try to capture eagles flying along the Mississippi this weekend. I always look forward to your informative blog posts. Keep up the good work!
Woah you can’t just brag about mango juice like that when I have none. Thanks for the advice and help… once again!
Also known as hyper focal focusing, if my memory serves.
Hyperfocal is slightly different, but it’s the general idea, yes. Someone’s going to read this and be very, very specific about it, but for example, when I set a zone that’s 4 feet deep, from 3 feet to 7 feet, that is not hyperfocal. Hyperfocal is the I set the f/stop and the minimum focal distance in such a way that infinity is included in the range. That’s a very un-technical way of describing it, but like i said, there’s a strong chance someone will step in with a much more accurate definition. 🙂
Yeah! But for those of us in the metric world when you mention feet we think you’re planning a dance move or something. 😉
Thanks David.
Clear, concise, and for me an AHA moment!
Thanks heaps as always, as a passionate amateur photographer I learn so much from your posts.
I am so glad to see you are traveling and doing well.
Thank you, Francie. Thanks for reading. 🙂 I’m travelling and doing very well. I have surgery on the 19th of February, hopefully my last to deal with my feet, and then the rest of 2014 set aside to recover, see more of Canada, and catch up with those things that always get neglected at home when you’re always travelling.
Healing mercies for your surgery and recovery. After five surgeries on my hands, with six new finger joints and three metal pins I have regained significant use.
All very worthwhile, It is much easier now to handle my trusty Olympus E-30. I am reading with great interest your posts, plus others, with an eye toward moving toward a lighter mirrorless camera, as soon as my savings will enable me to do so. 🙂
Please post how it all goes, wishing you the very best outcome!
David, simple and powerful! Thanks for sharing. Is it a way to determine that field zone on new dslr lenses were there is no scale?
Could you please write smth one day about focusing on hiperfocal? How to set lens in field without hiperfocal calculators when there is no scale on the lens?
Thanks!:)
m.
Hi Michal – Honestly, without the benefit of a scale on the lens, I wouldn’t know where to begin. I guess with an app on the iPhone or a chart, but I couldn’t for the life of me be bothered to do that.