
While people rush to buy the latest cameras with the highest dynamic ranges and the latest software that’ll allow simulation of the highest dynamic range possible, and there’s nothing necessarily wrong with that, it helps to remember that every limitation can also be a beautiful creative constraint.
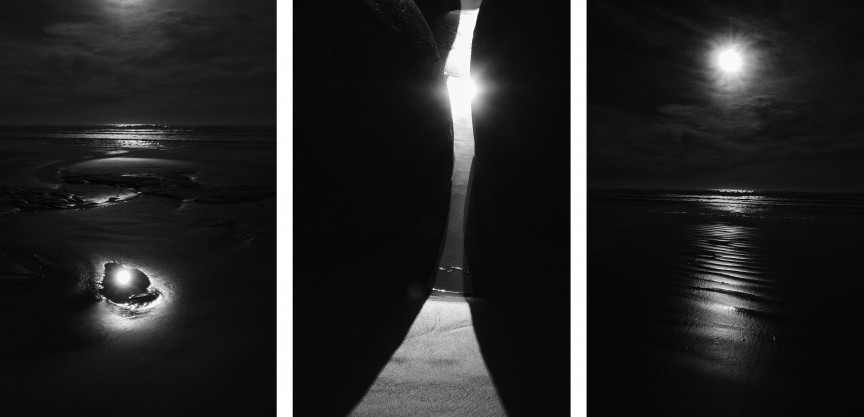
On the beach in Moeraki recently, and disappointed by the bright sunlight and apparent lack of mood I took advantage of the fact that my sensor can’t capture all the light that’s there. Not remembering to take a reference photograph, it’s hard to show you what things looked like but I can show you what it felt like to me because I was looking at the sun sparkling on the sand and to do that I had to allow everything else to go dark.


The technique is simple: expose for the highlights, the bands of light that would otherwise be too bright if I had exposed for the rest of the scene. The result is a histogram that preserves the details in the brightest places and allows the shadows to go to black, the reverse of what one might instinctively do in this scene. Or underexpose the scene by about 4-5 stops. Just keep going until the histogram shows no lost details in the important highlights (or fewer of them) – for me that was the parts of the image where the sun was rim-lighting the rocks or reflecting most directly on the sand. What I was drawn to was the elegant tones and texture of the sun directly hitting the sand, and this was a beautiful way of showcasing those. The results are rich and moody, shot directly as black and white images using the Acros film emulation on my Fuji X-T2. No filters, no post-processing other than a few nudges in Snapseed on my iPhone, just elegant, dramatic, black and white using old-school underexposure.
Hey, as a reminder, and to those that aren’t in the know just yet, I will be splitting my attention between this blog and the Craft & Vision blog where you can read articles from me, interviews with interesting photographers, and insights from C&V authors like Piet Van den Eynde. Please check it out.
Share this Post, Share the Love.
Comments
Cheers David, awesome as always, I’ve been struck recently with photographers who simply give up as situations aren’t right, rather than embracing the opportunity that every given situation brings, thinking on their feet and taking an advantage.
Location shooting is all about being flexible, thinking outside of the box, it’s not a time to give up, it’s a time to take it on (as my Mentor taught me)
Beautiful work. Just learned of your art from Katrin Eismann at School of Visual Arts. Your blog post is part of our reading assignments, and your work and attitude are inspiring!
Thanks, Kyle! Welcome here.
LOVE these.
Many times I see light this way but had no idea of how to express what I saw. These images are beautiful. Thanks for showing me how to break the rules. Can’t wait to try this out.
Hi
I assume you shot these in JPEG, correct? As far as I know, Snapseed can’t edit raw files.
Correct – From my XT-2 to my iPhone as a JPG. I shoot in RAW+JPG
Information from fellow photographers is always a good thing
I really like this type of photography (or is it insight) a lot ……
makes me aware again why it is I like contrasty B&W images and why I dislike most HDR …..
Love these images. I must remember to try this out next time I’m in a similar situation.
There was a theory I used to follow that recommended pointing the camera at the brightest part of the scene then, using spot meter, expose 2 1/3 stops to the right of center on the meter. The theory is that the brightest part is then at the edge of Zone 7/8 of Ansel Adams Zone chart https://omotayodaramolayr3.files.wordpress.com/2012/05/ansel_adams_zones_system.jpg , which is the last section that can practically contain highlight detail – zones 9 to 10 being pure overexposed white. Sounds like this is a similar idea. I really must get back to doing that.
Good work – when I was first learning photography I was really caught up in HDR techniques , and perhaps missing out on the opportunities you get for creative expression with a restriction on dynamic range! Still no less evocative , perhaps even more so then something clinically taken.
These images are following the Zone System devised by famous photographer, Ansel Adams. The problem today for people new to photography they do not get taught about the ‘Zone System’. I teach my photography students about this very early on in the course.
I love this series of images and appreciate that you are always embracing the creative constraints.
Wonderful David! Also great to see such a different take on the oft photographed Moreaki Boulders! I hope you enjoyed our country!
Fabulous.
Inspiring .
Thank you so much !
Cheers
Peter
Thanks David , I’m really enjoying the new book you sent me, well written and observed thanks again John
So inspirational. Thank you for the reminder to step outside how I normally think and take a new perspective on things.
I love your mindset, David! Thanks to your example over the years, I now pray for ‘bad light’ and other constraints when I show up to make photos. I didn’t believe you at first about working hard and embracing constraints. But you’ve convinced me! More than once I’ve thought to myself, ‘this is the worst situation possible.’ Then I admit that there’s got to be something beautiful that I’m just not seeing. Sometimes our photography calls for the counter-intuitive – like underexposure. Thank you for sharing your journey, frustrations, and achievements with us 🙂
Right on, Mat!
Goes to show there is no “bad” light, depends on how you handle it.
I love these mysterious images!! Thanks for sharing this great technique! (And the link to the new blog: I love it!!)
The ‘rules’ often say that we should aim for nice uniform histograms with no large chinks of black (or indeed white). These images show just how wonderful it can be to do your own thing and be more creative.
Yes, a uniform histogram is often boring. Everything converts to 18% grey. No highlights, no shadows.
These pictures show only shadow and highlights. Wonderful.
Very nice Dave. Thank you for the commentary and the really good advice.
Pingback: Εκθέστε για τα highlights – Photo news and stuff