
Being able to dissect an image is a helpful skill. Looking at a photograph and identifying the various choices that led to the look and feel of that image, even when it’s your own (maybe especially when it’s your own) makes us stronger photographers that are more fluent in the visual language.
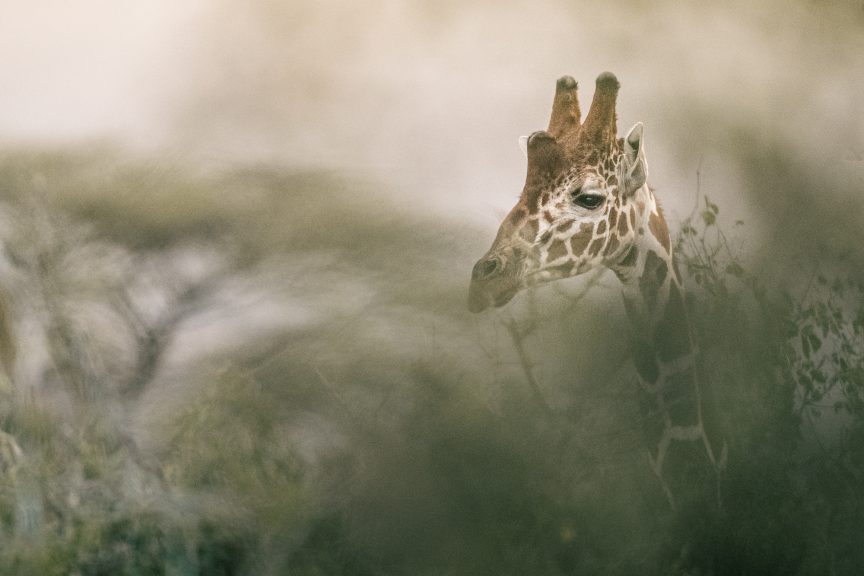
I’ve been talking a lot lately about the choices we make, and how our photographs are a result of the combinations of all those choices and what they contribute to the image. I though perhaps walking you through some of my photographs, beginning with this one, might be helpful (even if you never photograph giraffes).
The video below is about 17 minutes long and walks through my in-camera and development decisions in the making of a photograph from Kenya back in January. I thought video might just be a better medium for this than writing it all out. I hope it’s helpful to you.
Questions? Leave them in the comments. There’s a wonderfully thoughtful community of photographers that gather here every couple of weeks and the comments are often as helpful as my own contributions, so even if you’ve got nothing to add, don’t miss the comments below.
Thanks, as always, for being here. Do me a favour? If you find my writing or my teaching valuable, would you take a moment to tell other photographers in your life? This is my life’s work and it means the world to me but it’s the people that make it possible (and so rewarding). Please feel free to share my articles and videos in any way that makes sense to you. Just point people to my blog here at davidduchemin.com or if you like the convenience of getting these articles by email and think your friends would too, just point them to MyContactSheet.com
I hope you enjoy the video.
For the Love of the Photograph,
David
PS – Want more like this? I send these articles out every two weeks to photographers around the world who want to improve their craft and explore their creativity and I’d love to include you. Tell me where to send it and I’ll send you a copy of my best-selling eBook Make Better Photographs, as well bi-weekly articles, first-glimpse monographs of my new work, and very occasional news of resources to help you keep moving forward in this craft we love.
“Each and every one of your emails inspire and motivate me to want to jump right out of my chair away from my computer and shoot for the love of it . Thank you David.” – Millie Brown
Comments
Really helpful David. I hadn’t realised you could reduce the size of an image and apply a linear grad across it from outside… Will be trying that with some of my images where appropriate. As always your explanation about your choices was superb. Thanks so much,
Thank you David for that explanation about the choices you’ve made and how to emphasize them at post-prod.
Greeting from France.
Patrick
Great video, learned a lot!
I like your blog, because it is one of the few that deals with photography and not with gear.
Thank you David for a very helpful and informative blog. I liked the way you went through the process you followed in editing the image in Lightroom.
Sitting in a safari vehicle with 5 other guests and suddenly coming upon random sightings limits ones choices despite 2 camera bodies and lenses. Coping with the compromise is the first choice, and the challenge.
Love it and as usual your guidance provides the backup.
Enjoyed hearing about concept and intent rather tools.
For myself, I love seeing “behind the scenes” of how you shot and developed your images. For my students, this explanation reinforces my pitch that photographs are “made”, not “taken”. Thanks for sharing!
That was so informative David. I really learnt so much from this video really so much easier to see it done than to read how it’s done. You are a great teacher..
Thanks for sharing your techniques! I learn so much from each of your videos …
My pleasure, Manfred!
For me, this is a gorgeous image of a giraf for it’s choices in camera and in LR. It takes animal photography at another level. There is a feeling that emerges from the image, we could say a relation between the viewer and the giraf.
I’m so pleased you feel that way about the photograph, Colette. Thank you for saying so.
David I am a big fan of your work and instruction.
To do your linear gradient adjustments, how did you make the image go from ‘full’ frame to ‘postage stamp’size?
Hey Brian! Thanks for the encouragement. Sorry I wasn’t clearer – the curse of knowledge is that you don’t know what you (and others) don’t know and it never occurred to me to be more clear about that. On my Mac it’s Command and – (Command and the minus sign). Then Command and the plus sign (+) makes it bigger / zooms it back in. Very handy. If you’re on a PC, I think it’s CTRL and the minus or plus sign.
HI David,
I really enjoyed this video and appreciate your approach using choices. I particularly liked what you said about thinking about why you want to use a particular lens and the effect that has on your final image. Very helpful and food for thought for my next outing. Thank you
You’re welcome, Laura! 🙏
Wow – this was awesome to watch. I was very surprised that you changed the white balance to Daylight, rather than adjust the temp and tint manually, or by selecting cloudy option. The tips for getting that beautiful feathering is also very helpful – I wouldn’t have thought to start the gradient outside the photo.
Video breakdowns like this are super helpful – keep them coming!
I’ll do my best, Kate!
Thanks for sharing your thoughts about the way you make your choices. I try to make deliberate choices when I edit a photograph and of course when I shoot the photograph. It’s always nice to see how other photographers make their choices. You do this in such a calm and understandable way, so thanks again.
The pleasure is mine, Betty-Lou – thank you for the encouragement!
Thanks David. I liked the remainder on the decisions to be made on site, when taking the photograph. I have to practice that more, rather than think I can fix it during post-processing. But on post-processing, I learned a few things, such as centering the linear gradient way out of the frame. Thanks!
Glad I could help, Daniel. Seems there’s always something new to learn, isn’t there? Part of the fun and the challenge of this, I think.
I love your approach to photography and I am a regular reader of your blog post. I am a librarian at a school in South Africa. One of the other tasks that fall to the staff at the school is to run clubs. With my love of photography, I have chosen to run a photography club. Influenced by you, I am trying to get the message across about being deliberate in taking photographs and about the look and feel, the need to evoke a reaction, a response, or tell a story rather than the technical aspect (this also because most of the pupils only have cellphone cameras, and so the technical aspect is wasted on them, or at least they cannot really practice the finer technical arts of photography fully). I often quote or refer to you and your photographs, so much so that the pupils, being teenagers, now when I mention your name, often roll their eyes :). That aside, this video, is a lovely summary of all the aspects of being deliberate, so, later in the year, when we have done all the workshops I have planned, I hope to be able to show them this video as a summary if that is in order and to work through your photo booklet, “Kenya Light” as that also nicely illustrates different POVs, different light and working with (or not) depth. Thank you.
Elise, please feel free to share with your camera club anything I post on this blog. I’d be honoured to be part of what you’re doing.
Wonderful video David! I appreciate your teaching style and the clear and concise explanation on the edit. Such a lovely giraffe image…. makes me miss Kenya.
Debbie! So nice to hear from you. Kenya misses you too! We’d love to have you join us again when the time is right. 😘
Thankyou David… Very informative
A beautifully explained and presented video David. It gives me ideas of how to work on my own photos. Thank you!
You’re most welcome, Paul.
My pleasure, Lynn. I’m glad it was helpful.
Boy. this was great, David! The explanations were really useful, and inspiring. I have a new project in mind, we’ll see if I can “make good choices” with it.. 😎
Happy to help, Andy. Glad you got something out of it.
Thanks David.
I love that photograph and very much enjoyed you sharing the entire process from RAW to subtly and finely edited.
Beautiful results and as always, a lot of great information and knowledge to mull over and hopefully put to good use when I do get the opportunity to photograph my next masterpiece or well, my next humble but satisfying and loved project. ; )
Thanks again for sharing your love for the photograph in the way that you do. God bless!
Much appreciated, Stephen. Thank you for that.
I’ve been motivated by your videos and news emails to start a project, 365, taking a photo every day. The challenge is to create and images with mood and atmosphere under the conditions one finds. Your latest brilliant video explains the need for good camera skills but it’s the thought process that creates the image. The colour that create atmosphere and mood. I get a chance to practice, everyday what you’re advocating. I can feel my understanding growing, in stops and starts but it is growing. A huge thank you.
A huge “you’re welcome!” Thanks for that Cliff.
Glad people are stepping away from social media more and more. Its less ‘social’ and more a fight in the jungle. Congrats. Thanks for sharing your work on your blog instead.
I’ve been much happier since leaving social. I miss it once in a while, but really it’s not social media I miss, it’s social media the way it once was…
Great tutorial! It is so incredibly helpful to hear and see the decisions made in camera and then in post. I learned that foreground in an image can be subtle and then enhanced in post – I had never approached foreground in that manner.
Thanks, Pam!
A really clear and helpful tutorial. Your videos always do such a fantastic job of tethering the technical considerations to the creative intent.
Thank you David.
Thank you, Michael. It’s an honour to work for people like you! 🙂
I like the intentional way you think, to engineer a photograph for particular visual effects, creating an image by transforming a raw image into the picture you see in your mind’s eye, using the photo editing tools available to craft that picture in your imagination. At one time I used to be a member of a local photography club. Used to because I became disenchanted with their increasing emphasis on making images to win competitions and disapproval of crafting an image which they called ‘manipulating’ in Photoshop, for their view is camera centric ; the final image for presentation at the club disallows any manipulation other than minor exposure, curves and sharpening. The images I craft they call creative and are disallowed in any of their competition categories except the Creative Category started because of people like me. Finally, to quote you: ‘for the love of the photograph’.
What a shame, Norry. I understand some of the restrictions camera clubs use but I’m not sure I understand them all, especially as the end result is a discouragement of creativity. Seems short-sighted to me. Soldier on, my friend. There are some amazing clubs out there, and some that are probably best avoided if what you want is to grow as an individual and an artist.
Hi David,
Thank you for posting this, and making it look so easy ;-). One question, do you always leave noise reduction until the end of your workflow, or is the placement of noise reduction in the workflow dependent on the individual image? Cheers, Garnet
Good morning, Garnet. Yes, I almost always sharpen and reduce noise at the end. The reason for this is that some of the adjustments can bring out more noise and I like to know what I’m dealing with when I de-noise and sharpen.
Thanks a lot for your video and the way you explain the process. Got me considering thinking about the way I’ve been doing the same process… Very helpful. Thank you!
Right on. Thank you, Patrick.
Extremely helpful video, David! Thanks for posting it.
My pleasure! Thank you, Marcia.
Your videos are always inspiring, the explanations are relevant and so interesting. Being French-speaking I appreciate the well-paced flow of your language and your clear pronunciation, which allows me to understand your videos well. Thank you for your generosity in sharing your experience with us. I allow myself to share in turn and tell my photographer friends about you. I hope my English translation is adequate.
Merci beaucoup, Jacinthe. Votre anglais est mieux que ma Francais! 🙂
Always well thought out, simply explained, lessons generously shared. A pleasure to learn from: education rather than equipment sales pitch. Van Gogh was, and is, enjoyed for craft and content not for the number of bristles in his brush, DdC for loving what he does, seen clearly in what he presents. Thank you!
You’re very kind to say so, George, thank you!
Wonderful and inciteful video. Your video leads the viewer gracefully along to a superb image.
Thanks, Chuck! Happy to know you enjoyed it.