
In my last post (August 06), I discussed a few ways to improve the mood in our photographs, namely by finding stronger mood in the first place, usually by looking for more interesting light or more interesting weather. Just getting out there earlier and staying later helps. Some weatherproof gear and a willingness not to baby the camera so much that you never make the kinds of photographs you’d like to would also be an asset. But I think there is also work to be done in the darkroom—not necessarily to create mood where mood isn’t there in the first place, but to amplify the mood that’s there. To adjust it, maybe even maximize (or minimize) it.
Years ago, I wrote a book called Vision & Voice, and though it was based on a version of Adobe Lightroom that was so old I think it was coal-powered, the framework I articulated in that book remains the same for me to this day. When I develop an image, I rarely deviate from these four steps:
1. Identify Your Intent
2. Minimize Distractions
3. Maximize Mood
4. Draw the Eye
The first step is just taking a deep breath and giving some thought to what you want the photograph to feel like and what that means visually for you. Do you need it to be darker or lighter, warmer or cooler? Which tools might you need to use to get the image to feel more like the one in your mind?
The second step is cleaning up your canvas: eliminate sensor spots, tame wild highlights, straighten horizons, make basic fixes to the exposure, or crop it in a little—that kind of thing. You’re cleaning up the image so you can focus on the truly creative stuff: maximizing the mood and drawing the eye.
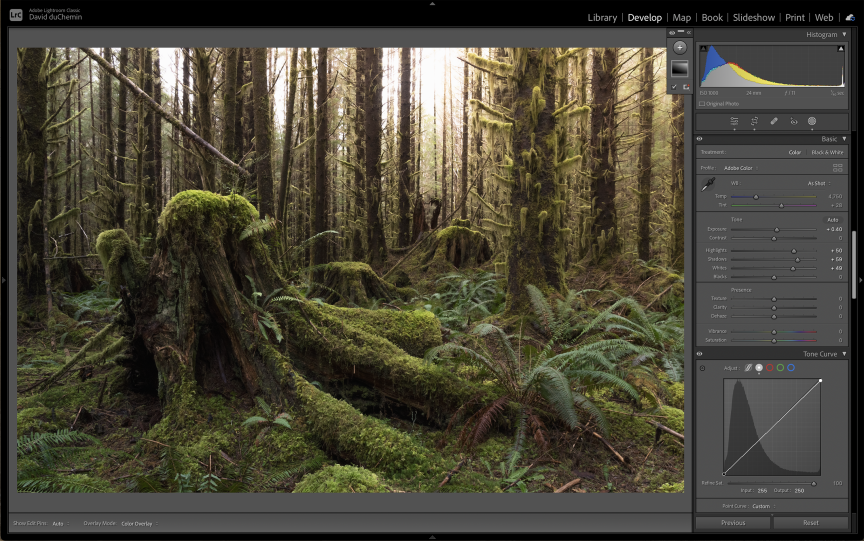
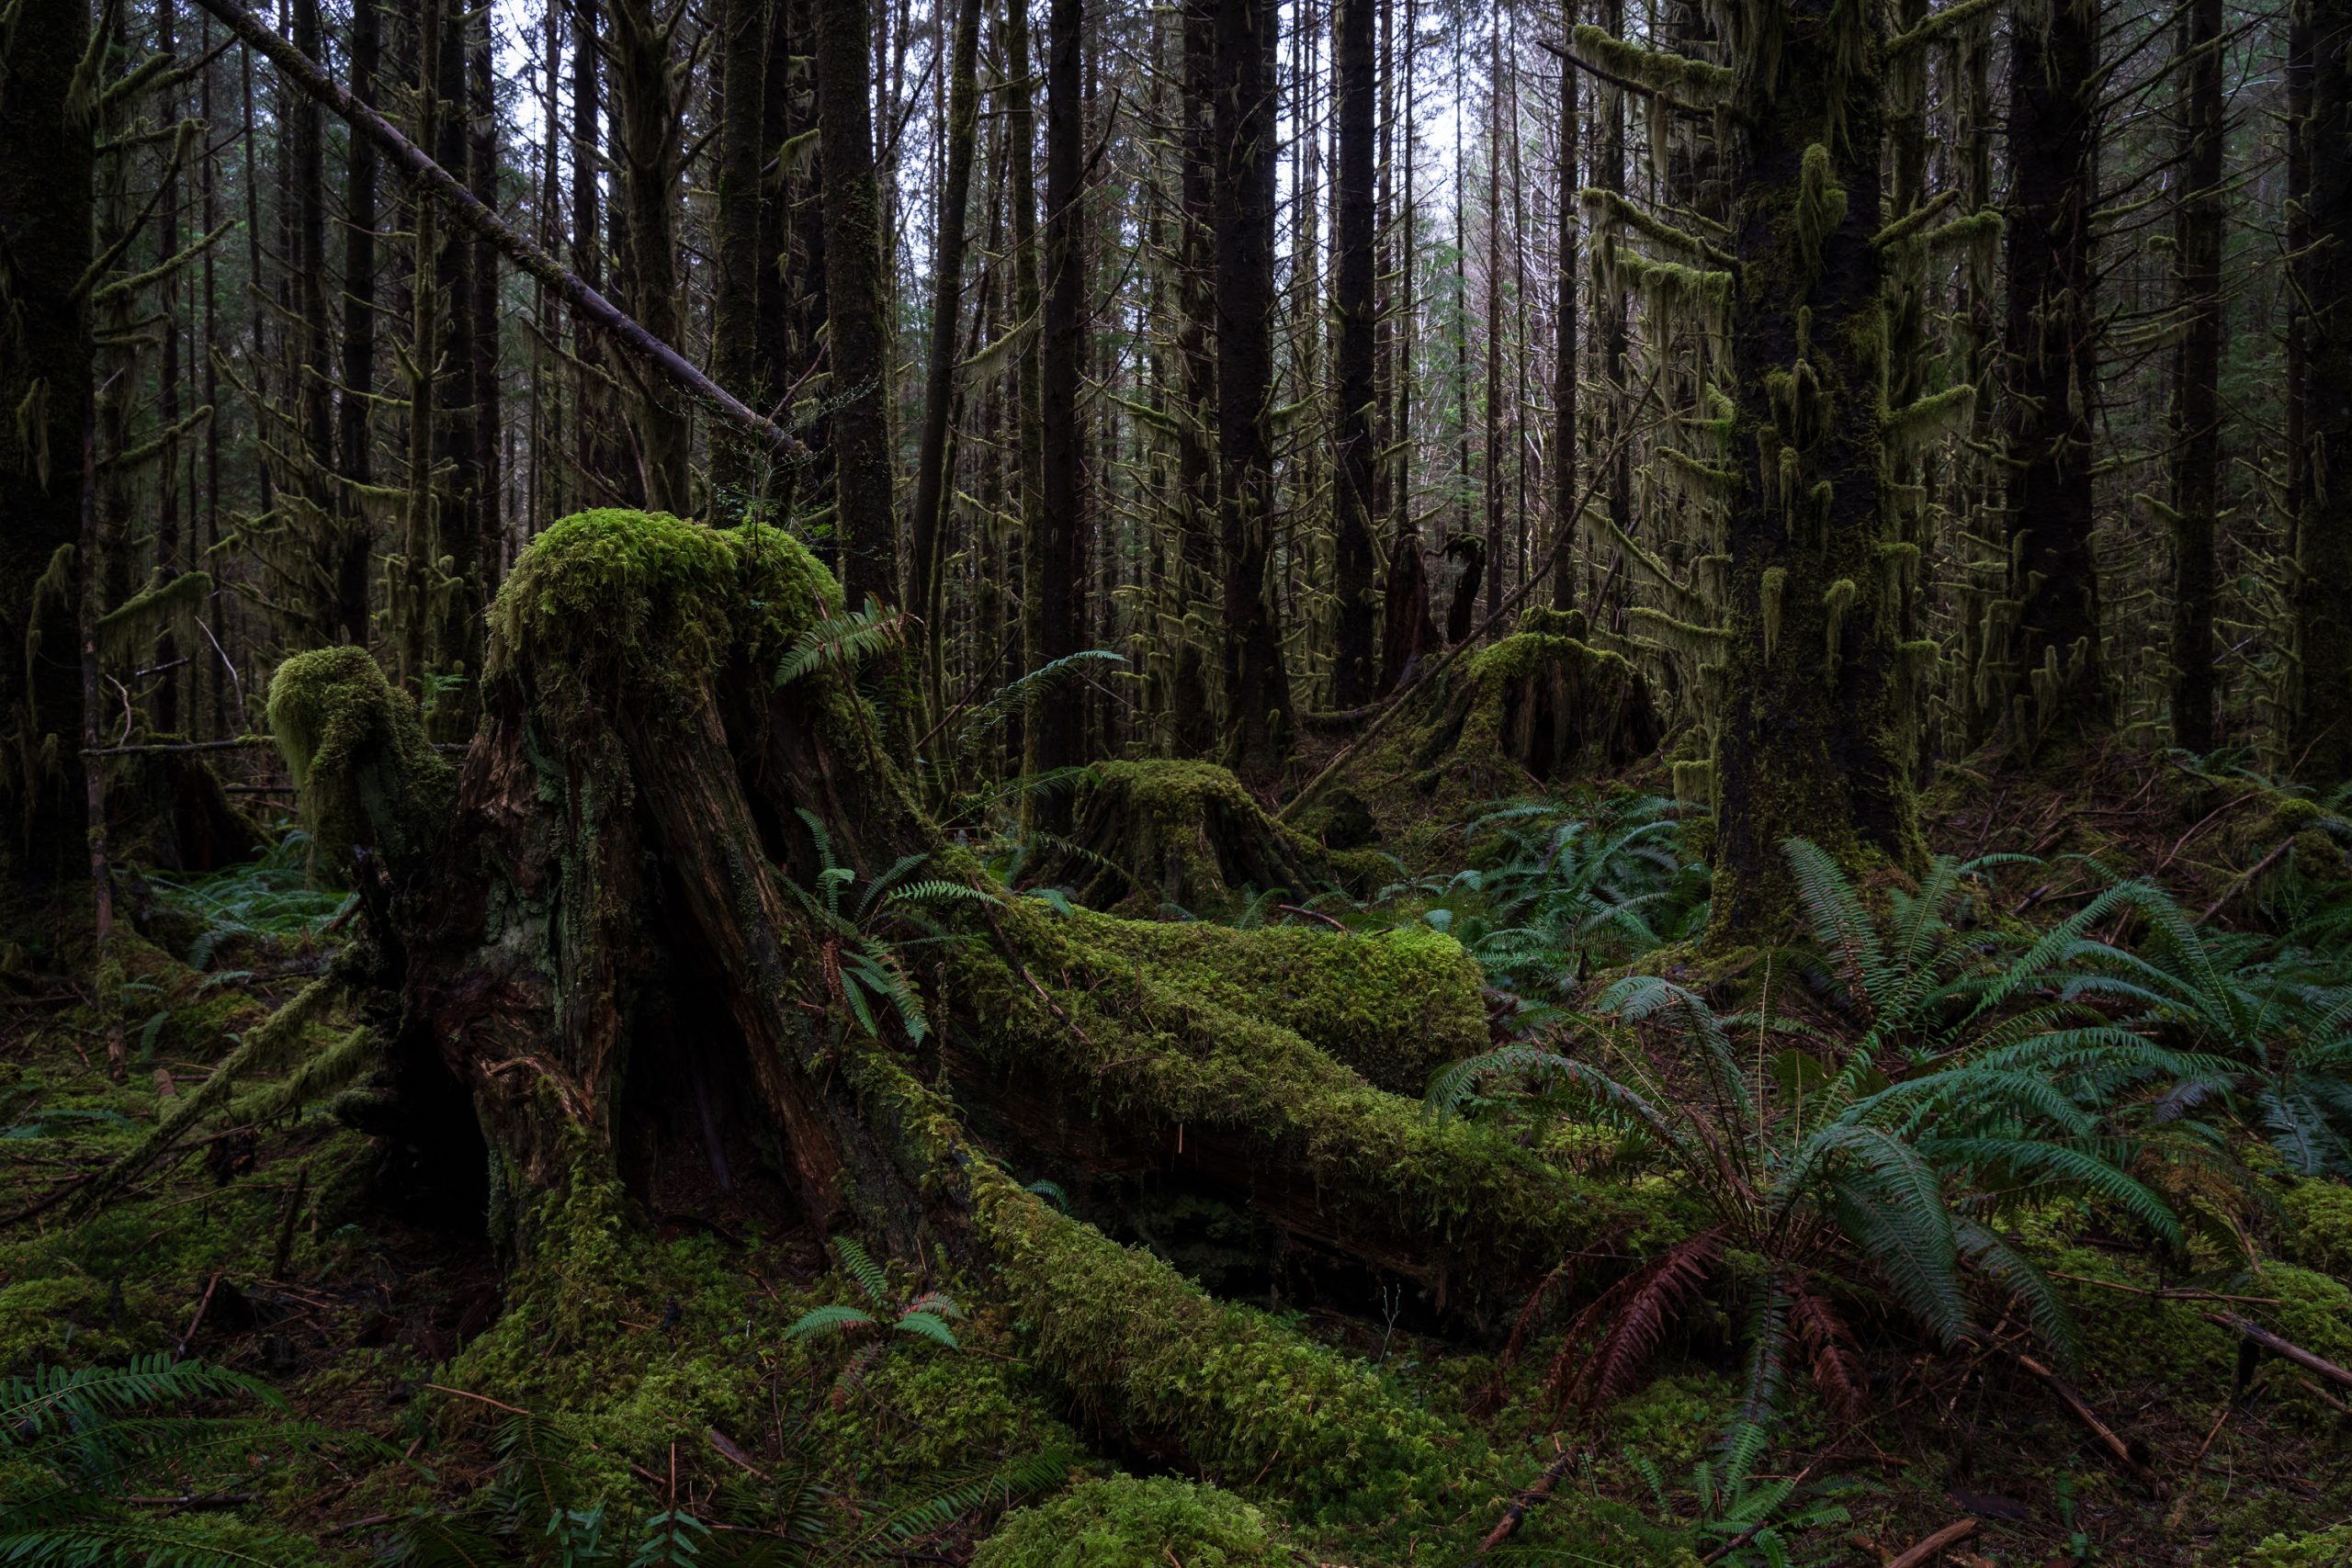
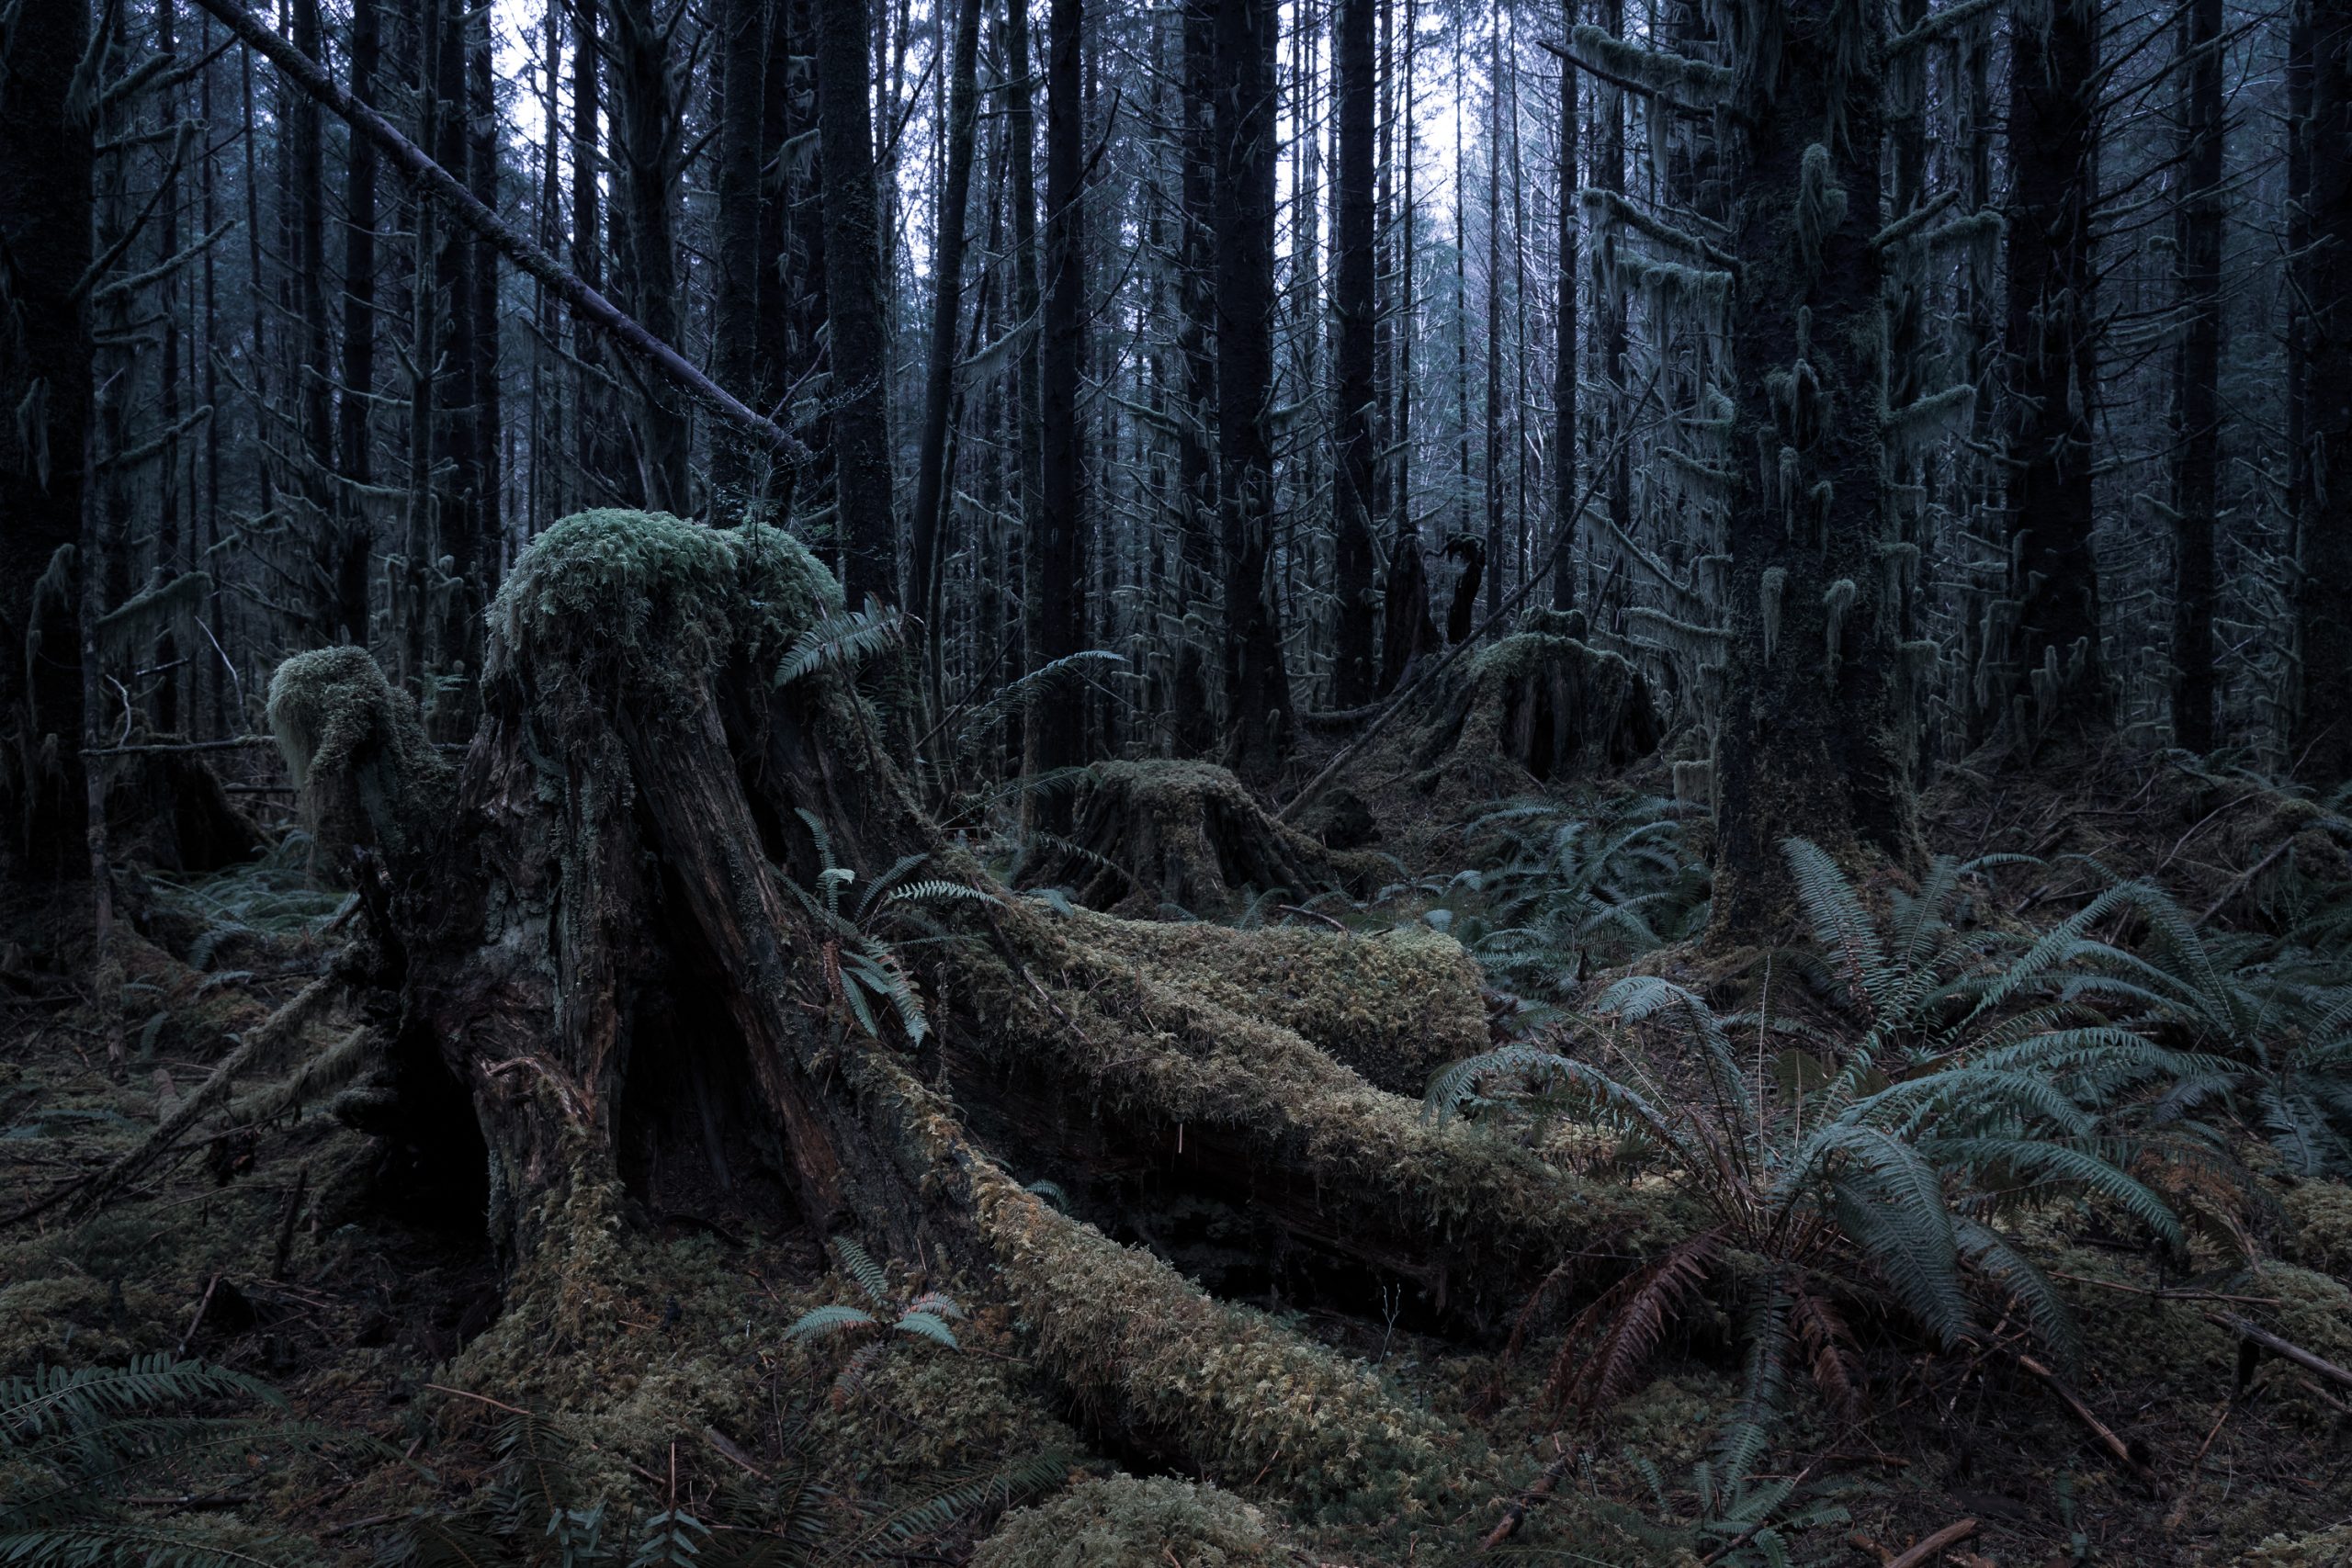
Maximizing the mood might mean making the image much darker. Sure, the exposure was correct, but could knocking it back a couple of stops make it feel more mysterious? Or do you want it to feel much lighter, even happy? That suggests adding exposure, lightening the blacks, and maybe warming up the image with colour temperature. Here are the three things I do most often to maximize the mood in my images:
Light or Dark?
Ignore the histogram at this point; there’s a whole lesson in there about not peaking your highlights or shadows, but for now, ask yourself what you want the image to feel like. Luminance is huge when it comes to how an image feels. Your Lightroom tools to accomplish this might be as simple as pulling back the exposure slider, but that affects the exposure on everything, and perhaps you want to keep those highlights a little brighter. Have you tried only darkening the shadows or the blacks? Maybe it’s worth asking not only if you want the image lighter or darker, but where you want that change made. That might mean “in which tones,” but it might also mean in which areas of the image. Perhaps pulling the exposure down globally isn’t necessary to impact the mood, and you’d be better off just darkening the sky with a gradient filter. That one mood could certainly amplify the mood created by storm clouds, for example.
Warm or Cool?
Warm and cool aren’t visual words; they are feeling words. We feel bluer/greener images to be cooler, and warmer images lean into the yellow/red end of the spectrum. One of the quickest ways to amplify the mood of an image is to change the colour temperature. I usually do this in collaboration with the changes I make to luminosity (i.e., the lightness/darkness of an image). It’s rarely one or the other but both.
Saturated or Desaturated?
Colours are not only a matter of whether they are warm or cool, light or dark, but also the intensity of the colour(s). That’s saturation. We feel differently about images that are more saturated than others. Hot pink feels different than pastel pink. They can both be exactly the same hue, but feel different because one is super intense (saturated) and the other is not. An image with heavier saturation feels livelier and more full of life than one that is really toned down.
I showed you two of the images below in the previous post. The first is the RAW image as shot. Then there are two versions, both with changes to luminance, colour temperature, and saturation. I think they all feel quite different. The mood changes from one to the next with just the three kinds of adjustments (though I’ve used various tools). Spend a few minutes trying to figure out which changes were made and how they made the images feel differently. I hope this short article nudges you to open some images in whichever development tool you use and play with refining the mood in your own work.
The last step in my development framework is drawing the eye, which mostly amounts to dodging and burning—though it’s so much more than that, and there’s no way to fully discuss it in one article. (If you’re interested in exploring that further, I have an excellent eBook called Drawing the Eye, which is available HERE for $16.) But think about how you might simplify your workflow by using this framework to provide some structure and, most especially, how you can refine the mood in an image to give it more specific impact.
My apologies for the shorter article this week; things kind of crept up on me. I’m also diverting some of my energy to short reels on Instagram, and between that and visits to my surgeon (“Everything is great with the amputation—go live your life,” she says) and my prosthetist (new leg comes on Tuesday!) and my new trainer, it’s been busy. I hope this finds you well.
For the Love of the Photograph,
David.
Comments
Hello David, in the first image you de-saturated it and made the temperature cooler, i think you didn’t touch the luminance ; in the second you made the opposite, you satured it, you made the temperature warmer and at last you raise the luminance.
Hello David. I am so enjoying your course and new s letters. Just have a quick question do you ever use filters. CPL or ND ?
Kind regards
Carol
Hi Carol! Yes, I have often used CPL and various ND filters, mostly for landscape work. It’s been a while since I did that kind of work, but the moment I’m back out there, focusing on landscapes rather than critters, I’ll have my filter kit with me. Polarizers and ND filters especially make in-camera effects possible that are impossible to replicate in photoshop.
I hope this helps!
Just. Finished the last lesson in Image Works. Wow. So much to think about and consider, and such a great breakdown of the relationships between all of the elements of capturing the image, the interplay of the tools and adjustments in post-production, and the interplay between both disciplines. You do a great job of showing, sharing, and demonstrating all of the concepts that you cover, but you also have an outstanding ability to invite us to experiment and develop our own vision for every Image.
Thank you for all of it – and looking forward to The Compelling Frame.
P.S. – I hope that you are progressing with the new leg and that you are moving toward your goals with mobility, freedom, and your plans to “get out there”, to do more, and have more toshare more going forward. You go!
Thank you so much for that, Paul! Means a lot to me to hear good feedback. And thank you, too, for the encouragement and best wishes. So far so good! Today I pack the truck with gear and first thing in the morning I’m off on my first trip since the amputation – a week with grizzlies. I can’t wait!
You have made me curious and excited about refining your mood in the darkroom. I appreciate how you explained the theory and practice of each technique and gave some useful advice and recommendations. Your examples are impressive and show the contrast and improvement of each effect. Thank you for this informative and enjoyable post!
merci beaucoup pour tous vos conseils
Vivez votre vie avec votre nouvelle jambe et bonne chance
A très bientôt en ligne
Il est vrai que pour moi cela me demande un effort car mon anglais est de plus en plus loin
Hi David,
I still have a copy of Vision & Voice and it remains one of the reasons for my respect for your teaching work (and for the images). The gear and software has changed beyond all recognition, but the lessons haven’t – ultimately it is all about the image and what you wrote then, what you have always written about the image remains better than most !
I hope the new leg works well and doesn’t hold back the creativity if needing time and attention to get to use properly !
That was a very helpful article. I’m definitely going to try your method of increasing mood.
Thank you for your messages.
Keep exercising and I hope you improve your walking quickly.
Thanks David for you enlightening comments! I find I am looking forward to you emails! Glad your recovery is going well!
I hope all is well with your new leg. I always enjoy your blogs. If you are ever in New York I would be happy to buy you a drink.
I hope all is well with your new leg. I always enjoy your blogs. If you are ever in New York I would be happy to buy you a drink.
Gary Halby ppg@earthlink.net
Great input ! You reminded me not only to review the technicalities in editing a phot; but also to pay attention to the mood I want to promote.
Good luck with the leg ! Keep up the excercise ! There may be set – backs, but you have the strong personality and commitment necessary to succeed.
P.S. I’d love one of these delightful example mailings using different moods in B&W specifically. Thanks!
the 8/20 aticle was fine and remindful – that which we all need regularly. Thank you.
And much good energy and progress with the new prosthetic this week.
Best, Mariann
Well how timely. I was out this morning exploring the limits of my lens mostly in the 35-50mm range with a mix of apertures and shutter speeds, shooting landscapes along a local trail. Than off to top up my groceries and back home to load my shots on my laptop and look at that. Davis has a new article. What a great timely reminder. Thanks David. Time to put the coffee on and get at it. Good luck to you. Regards, The one-handed southpaw photogoofer.
Your book Vision and Voice made a huge impact on my photographs, challenging me to go bolder in my edits to draw the eye. Thank you for that and all your teachings!
Ha! You needlessly apologized for the shorter article this week, but nevertheless, it was GOLD! Steps 3 and 4 are what I struggle with – I tend to take my photos at face value once the first two steps are out of the way. When people mention these additional steps they took, I’m always like…. but… but how do you know what it needs and how do you know how to get there and…..? 🤷🏼♀️
So I continue accepting mine at face value and lament the fact that they just are what they are and that’s all that they are. (If I may paraphrase my old friend, Popeye.)
Good luck with the new leg David. I hope all works out well for you.